React D3 Tutorial: Getting Started with Data Visualization in React
Introduction
ReactJS is a powerful UI library that many developers turn towards these days to create fast, snappy and complex user interfaces, and it continues to grow into a more mature and robust solution for implementing user interfaces day by day. Meanwhile, whenever developers have to deal with data visualization, oftentimes their immediate go-to JavaScript library is none other than D3 (short for Data-Driven Documents).
Assuming we have to create a user interface that is powered by data manipulation, using both of these libraries in conjunction can potentially solve many problems.
So, let's outline several methods for you to implement D3 with ReactJS to create those high-end data-driven user interfaces you are looking for!
What You Will Learn
The 🗝 key take-aways of this blog post include:
How D3 works
Different ways to integrate D3 and React
Displaying and updating a simple dataset (+ React Hooks!)
Prerequisites – What You Need to Know
Before we dive headfirst into React D3, it is better to have some know-how of ReactJS to make it easy for you to absorb all the information in this post.
Since this is not a ReactJS tutorial, we would recommend you check out the official React docs to get a basic understanding.
To get a thorough front to back understanding of React, you can always get the Fullstack React book.
What is D3?
As we established earlier, D3 is one of the most widely used JavaScript libraries for data manipulation and visualization. D3 works at a lower-level to allow users to create a visual representation of the dataset at hand. Now, one may wonder what it is about D3 that makes it the best at what it does.
In essence, D3 makes use of HTML, CSS and SVG elements as the core building blocks for visualization, and offers complex methods to empower our UI to handle different types of datasets. Not only that, as developers we’re given complete control over the outlook and handling of the elements we create. Varying from dataset to dataset, there is not a single solution that we can use to extract the most useful insights through visualization, therefore D3 gives us the freedom to shape and manipulate our visualizations as needed.
How D3 Works
Firstly, we use D3 to load the data using select() or selectAll() depending on how many elements we want to connect. Next, we use data() to bind our dataset to those DOM (Document Object Model) elements. Once connected, we can update the DOM elements based on changes in the data. This process is called "Data Joins".
Once connected, we can use any modification methods, such as text(), and create a custom render function that will map and render our data values to elements.
If we have more data values remaining, we can call the enter() function, and append() new dynamic elements to map the rest.
Finally, if we would like to dynamically remove any of those elements, we can call the exit() function, and then remove() the required elements.
The following code outputs a list of paragraphs using the data items provided in the data variable, by mapping three of the data values to the existing tags and then appending new <p> elements to the container <div>
<div id="container">
  <p />
  <p />
  <p />
</div>
const data = [1, 2, 3, 4]

d3.select("#container").selectAll("p") // selects our target nodes
  .data(data) // syncs the data to the nodes
  .text(value => "Existing element " + value) // sets the inner text of the existing nodes
  .enter() // enters into the selected nodes with the given data
  .append("p") // for any remaining data in the list, creates new "p" elements
  .transition() // applies a transition
  .text(value => "New element " + value) // sets the value of the newly added elements
In this method, we tell D3 exactly what we want and let it handle the rest for us.
D3 also provides us with a lot of different utilities, such as transitions, brushes, and polygons to make our visualizations highly customizable.
Integrating React and D3
Both React and D3 have amazing capabilities to access and modify the DOM. However, when we want to implement D3 within a React application, it is very important to figure out a way to modify the DOM in such a way that both libraries do not clash with each other.
🔹 Libraries must not be given shared control over the DOM
To circumvent this issue, there are a number of ways of integrating React and D3. Let's take a brief look at how each implementation works.
1. Giving D3 complete control
In this approach, we give complete control of mutating the DOM to D3. This is done by using refs and giving D3 direct access to modify that DOM element.
In our React component, we modify the componentDidMount and componentDidUpdate lifecycle methods to enter, update and exit the subject element, SVG in our case.
This approach is very useful if we already have a D3 implementation that we want to use in our React code. However, due to the fact that D3 has complete control and we're not using React to modify our elements, our code may not follow "The React Way" of doing things.
That does not mean that we can't use state though. In fact, we can isolate our D3 logic in multiple React components, play with the state of those components and integrate them into a larger React web page.
2. Using D3 with React lifecycle methods
Nicolas Hery describes this approach in detail on his blog. In essence, this approach allows us to utilize React lifecycle methods to sync our D3 calls.
For example, we will:
Createour D3 elements incomponentDidMountUpdateour D3 elements incomponentDidUpdateDestroyour D3 elements incomponentWillUnmount(deprecated)
This is done within class-based components, by encapsulating our D3 code within an object that handles all of the D3 logic and calling that object within our React component.
3. Letting React handle the rendering
This is the approach that follows "The React Way". What this means is, we will let React handle the rendering, and only use D3 for computation. Therefore, we can create functions for our D3 computations, such as for calculating scales and ranges, etc. These functions are then called within the render method of a component to dynamically create and update those elements.
This approach enables us to fully utilize React when working with D3, and as such we are responsible for creating our own shapes and animating them. Therefore, we're free to use any React libraries such as react-spring for animation. Since it requires us to utilize low-level D3 concepts, it is not preferred for complete beginners to start with this method.
Implementation of D3 within React
Let's create a simple D3 visualization to show rectangles of various sizes using the first approach: Giving D3 complete control.
We will look at two ways to do this, using class-based components and then looking at the React Hooks implementation to compare the differences.
❕ We're using
create-react-appto generate our React application from scratch here.create-react-appis a minimalistic generator developed by the React team to quickly get up and running with React.
You can use the following command in the command line to get a minimal boilerplate set-up for React.
npx create-react-app d3React
This will create a folder 'd3React', and install all the required dependencies.
Next, you need to install the D3 NPM package. For that, you can use the following command,
npm install d3
Now that everything is installed, you can empty the App.js file, and start writing your own code.
Within App.js, you can simply import and display a new component that will be created next. This is what the file should look like,
import React from "react";
import RectClass from "./RectClass";

const App = () => (
  <div>
    <RectClass />
  </div>
);

export default App;
In the newly created RectClass.js file, we can start sprinkling D3 into our React code.
Let's start with the following,
import React, { Component } from "react";
import "./App.css";
import * as d3 from "d3";

class RectClass extends Component {
  constructor(props) {
    super(props);

    this.state = {
      data: [5, 3, 6, 1, 2]
    }; // create a small array to use as test dataset
  }

  componentDidMount() {
    this.createSvgContainer();
  }

  componentDidUpdate() {
    this.createSvgContainer();
  }

  createSvgContainer = () => {
    // ...d3 code to update our SVG
  }

  render() {
    return (
      <div
        style={{ border: "2px solid black", padding: "10px", width: "300px" }}
      >
        <svg ref={svg => (this.svg = svg)}></svg> {/* SVG DOM node set as ref to use with React */}
      </div>
    );
  }
}
export default RectClass;
In the code above, you will firstly return an empty SVG and create a new ref for it so that we can reference that DOM node within our React code.
Now, we know from earlier that to dynamically update content using D3, we need to enter(), update() and finally exit().
To handle create and update, you will call the createSvgContainer() method in both componentDidMount and componentDidUpdate.
Within createSvgContainer(), you will execute the following code:
const svg = this.svg;

const selection = d3
  			    .select(svg)
      			.selectAll("rect")
      			.data(this.state.data);
This will let you select the SVG dom element using D3, and target the "rect" sub-elements. Next, you will perform a join by synchronizing the small dataset (stored in the state) using data().
Now that we have a selection, we can use that to enter() using D3, and perform the necessary changes in attributes and utilize all the functions D3 provides us with.
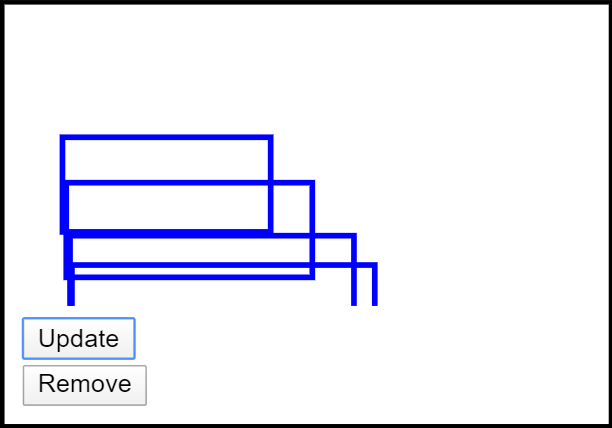
As an example, you can create rectangles inside the SVG, apply some styling to those rectangles and set the height and weight to a calculated value.
selection
  .enter() // selects all data points without a corresponding element
  .append("rect") // create new element for each data value
  .merge(selection) // calling this enables us to target both existing and new elements
  .attr("class", "new-element") // set the class of new elements to 'new-element'
  .transition() // add a cool transition to the below attributes
  .duration(1000) // duration of transition
  .attr("width", value => value * 10) // set rect properties
  .attr("height", 50)
  .attr("x", value => value + 10)
  .attr("y", value => (value * value) / 2)
  .attr("stroke", "blue") // set styles
  .attr("stroke-width", "3")
  .attr("fill", "transparent");
Now that the attributes are defined, we would like to apply when entering or updating elements, let's define a way to remove elements using D3.
selection
  .exit() // target elements that are no longer needed
  .transition() // enable cool transitions
  .attr("width", 0) // set final styles before removing
  .attr("height", 0)
  .remove(); // remove element from DOM
The end result is going to be an SVG with a few boxes having blue borders.

Now that you have newly created elements, you can start to update them or remove them. To do this, let's create two new methods in our class component.
update = () => {
  const newData = this.state.data.map(value => value + 5);
  this.setState({ data: newData });
};

removeLast = () => {
  const newData = [...this.state.data];
  newData.pop();
  this.setState({ data: newData });
};
Our update function creates a new array where each value in the previous array has been added by 5.
Meanwhile, our removeLast function does exactly that, it removes the last item from the data array.
Now, we need to call these functions somewhere. Let's create two buttons, update and remove that call these functions for us.
The updated render method will look like this,
render() {
  return (
    <div style={{ border: "2px solid black", padding: "10px", width: "300px" }}>
      <svg ref={svg => (this.svg = svg)}></svg>
      <br />
      <button onClick={this.update}>Update</button>
      <br />
      <button onClick={this.removeLast}>Remove</button>
    </div>
  );
}
Now, since we already have the required D3 code to handle the update and exit process, we don't need to do anything else. Simply calling the update and remove buttons will work exactly as expected.
Awesome!
Implementation using React Hooks#
Let's do the exact same thing we did above, but instead, use React Hooks and see how they can make our life much easier.
import React, { useState, useEffect, useRef } from "react";
import { select } from "d3";

export default function RectHooks() {
  const [data, setData] = useState([5, 3, 6, 1, 2]);

  const svgRef = useRef();

  useEffect(() => {
    // ...D3 code
  }, []);

  const update = () => {
    const newData = data.map(value => value + 5);
    setData(newData);
  };

  const removeLast = () => {
    const newData = [...data];
    newData.pop();
    setData(newData);
  };

  return (
    <div style={{ border: "2px solid black", padding: "10px", width: "300px" }}>
      <svg ref={svgRef}></svg>
      <br />
      <button onClick={update}>Update</button>
      <br />
      <button onClick={removeLast}>Remove</button>
    </div>
  );
}
The JSX, as well as our update and remove functions, will look quite identical. However, since we're using a functional component, you will not be using lifecycle methods at all.
Instead, first, you need to initialize the state with the useState() hook, then assign the SVG ref using useRef().
You will then use the useEffect() hook instead of lifecycle methods, and select the ref, and make changes to it using D3 as we did previously.
useEffect(() => {
    const svg = select(svgRef.current); // select svg ref

    svg
      .selectAll("rect")
      .data(data)
      .join(
        enter => enter.append("rect").attr("class", "new-element"),
        update => update.attr("class", "updated-element"),
        exit =>
          exit
            .transition()
            .attr("width", 0)
            .attr("height", 0)
            .remove()
      )
      .transition()
      .duration(1000)
      .attr("width", value => value * 10)
      .attr("height", 50)
      .attr("x", value => value + 10)
      .attr("y", value => (value * value) / 2)
      .attr("stroke", "red")
      .attr("stroke-width", "3")
      .attr("fill", "transparent");
  }, [data]);
Notice how we're also utilizing a cool feature D3 allows us to use, which is .join(). Within this function, we can pass functions for all three enter, update and exit phases and perform the required actions to each.
❕ To get a similar effect as componentDidUpdate, we are adding the
datastate variable as a dependency in ouruseEffectfunction. This means every time the dataset is updated, this function is called and D3 has to execute the update process.
Instead of assigning duplicate attributes and styles, we can simply factor out all of those chained functions and append them to the end of our chain.
Conclusion
D3 is great to load, manipulate and display data using complex computations. React is great to create highly dynamic and powerful user interfaces. What do you get when you combine them? The answer: A complete solution to create web applications that display multiple dynamic charts, graphs and other types of data visualizations leveraging React state for interaction between and within components.
There are many D3 React libraries worth exploring, as well as techniques to make D3 and React work together. It's no secret that to get the best results out of both libraries, you must master the basics of each library individually, and then give a shot at creating breathtaking visualizations!

