React Redux Explained: A Beginner’s Guide to Redux State Management
Introduction
All React developers have at one time or another worked with state variables that have gotten out of hand. This happens most often when working with deeply nested components. Whenever we need to share state between components at different levels, we need to 'lift the state', which means keep the state within the closest parent component. That's fine when you're only one, or maybe two components deep but it still isn't preferred because of how many extra lines of code we have to write. Not to mention, it can be a pain to debug! 😩
This is why we have 'state management solutions', such as Redux.
What You Will Learn
The 🗝 key take-aways of this blog post include:
What is Redux?
Practically using Redux with Hooks
Intro to Redux Toolkit
Intro to React Context and MobX
Prerequisites – What You Need to Know
Apart from knowing the basics of React and state management, you should also understand functional programming with JavaScript. It would be quite useful to know ES6 syntax as we use the spread operator and default parameter operation in the examples below.
Since this is not a ReactJS tutorial, we would recommend you check out the official React docs to get a basic understanding.
But What is Redux?
Redux is undoubtedly one of the first solutions many developers consider when trying to solve this problem, and rightly so. Redux enables us to keep our state in a global store, and have the power to access that state in any connected components. This means we don't need to manually pass props (also called prop-drilling) and it enables us to get a lot more debugging features that can take the developer experience to the next level.
As it says on the official Redux website, it is:
A Predictable State Container for JS Apps
A few years ago when I picked up React, I immediately tried to jump into Redux. Unlike React, which was easy to grasp and implement quickly, Redux just didn't make sense to me. I'm sure most new developers feel the same. There's a lot of boilerplate, and you end up wondering why you have to create so many files just to solve this state management issue you're facing.
However, only after my first couple of projects with React, the need for a state management solution such as Redux was made clear to me.
In essence, apart from managing some sort of global or shared state, most medium-to-large scale applications require predictability as well as ease of debugging. Redux sets up a foundation for the data flow in your application so when you need to work with complex state changes or implement new features in your existing React app, you can do it with confidence.
Redux is not the only state management solution available to developers, and we'll discuss different options further down below.
How Does it Work?
Redux works on a modified implementation of the Flux architecture. In short, we have a central store that manages the state of the complete application. To modify that store, we need to trigger certain functions (or, actions) that can safely modify the state.
Before understanding the complete Redux flow, let's take a look at some Redux terminology:
Actions
Actions are plain JavaScript objects that have a 'type' key, as well as an optional 'payload'. We use the dispatch function from react-redux within our React components that broadcasts the action object, and the appropriate reducer function receives it.
Action Creators
Action Creators are JavaScript functions that define and return action objects.
Constants
It is a convention to describe and save action types as constant strings. It is not necessary but provides us with a lot of benefits such as easy debugging and consistency.
Reducers
Reducers are 'pure functions', which means they always return the same output for the respective input you pass to them. This is what makes our state mutations with Redux predictable and easy to reason about. They are responsible for making changes to the state in our store according to the action that was dispatched.
Store
As the name suggests, it is the store where our state lives. Redux works with a single store object, however, it can be separated into different files and objects to make it easy to work with. The only way to interact with the store is through reducers.
Middleware
We do not call any asynchronous tasks within reducers to keep true to the 'pure function' nature of reducer functions. This is why we need to intervene in the flow to make any necessary asynchronous calls, such as HTTP requests in middleware functions. The most common types of middlewares are Redux Thunk, Saga and Observable, all of which have varying levels of difficulty and functionality. As always, it is a good idea to research all of your tools before opting for them in your projects.
The Redux flow follows these steps:
An Action is dispatched from our React component
The appropriate Reducer function is called based on the Action type
The modified state is returned by our Reducer, which updates the Store
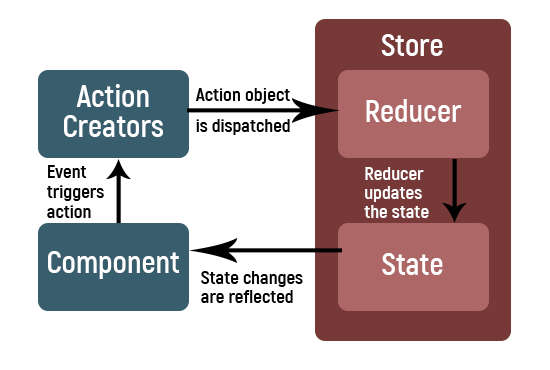
If we're using a middleware library, our self-defined middleware function is executed between step 1 and 2, when the action is dispatched. If we're calling an API, typically we call further actions based on the status of the request. For example, if our request to fetch a piece of data was successful, we may call a 'success' action, otherwise, we may call a 'failed' action.
Getting Started With an Example Application
Let's try implementing a Redux store from scratch. Before we begin, we need to initialize a React application, and for that, we'll use create-react-app to get up and running in a minute.
Simply open up a terminal and type,
npx create-react-app redux-tutorial
We're using npx which executes the library without having to globally install it. This command will create a new folder called redux-tutorial where our newly created React app lives.
Inside the project folder, we need to install redux which is the core Redux library, as well as react-redux which provides us with React-specific bindings for Redux.
npm i redux react-redux
Finally, type npm start to spin up a local development server.
Now, referencing the data flow defined in the previous section, let's create the Redux components step by step.
1. Creating a Store#
At the root level, create a store.js file where we will create our Redux store.
import { createStore } from "redux";
import reducer from "./reducer";

const store = createStore(reducer);

export default store;
Although we can configure our store to use various Redux tools including middlewares, here we will simply use our single reducer to initialize our store and export it.
2. Creating a Reducer#
We can create and combine multiple reducers, however, for the sake of simplicity, let's define and export a single reducer.
const initialState = []

const reducer = (state = initialState, action) => {
  switch (action.type) {
    case "ADD_TO_CART":
      return [...state, action.payload];
    case "CLEAR_CART":
      return [];
    default:
      return state;
  }
};

export default reducer;
As we discussed, Reducers are pure JavaScript functions. They accept the initial state as the first argument and the dispatched action in the second. We will use a switch-case block to determine what to do depending on the type of action.
❕ Note: Redux state is immutable, which means we can't directly modify it. Instead, every time we need to modify our state we will return the complete state. This is the reason we are using the spread operator ( ... ) to concatenate the previous values of our state instead of simply using
jsstate.push(action.payload)
3. Defining Action Creators#
Actions are plain JavaScript objects. We simply use Action Creators to get a function that we can call in our application instead of manually creating an object every time. This helps us with consistency and debugging, similar to how constants help us.
export const addToCart = payload => {
  return {
    type: "ADD_TO_CART",
    payload
  };
};

export const clearCart = () => {
  return {
    type: "CLEAR_CART"
  };
};
Since we need an item that we can add to our shopping cart, we will pass it as an argument to our action creator which sets the payload.
4. Bringing It All Together#
In our App.js, we can use local state to synchronize our input field. Our "Add to Cart" and "Clear Cart" buttons simply invoke local functions.
import React, { useState } from "react";
import { useDispatch, useSelector } from "react-redux";
import { addToCart, clearCart } from "./actionCreators";
import "./App.css";

function App() {
  const [text, setText] = useState("");

  const dispatch = useDispatch();

  const items = useSelector(state => state);

  const addItem = () => {
    // ...
  };

  const clear = () => {
    // ...
  };

  return (
    <div className="App">
      <input type="text" value={text} onChange={e => setText(e.target.value)} />
      <button onClick={addItem}>Add to cart</button>
      <ul>
        {items.map((v, i) => (
          <li>{v}</li>
        ))}
      </ul>
      <button onClick={clear}>Clear Cart</button>
    </div>
  );
}

export default App;
To dispatch functions and select our Redux state, we need to import two hooks from react-redux.
import { useDispatch, useSelector } from "react-redux";
Then, we can initialize the dispatch function by calling,
const dispatch = useDispatch();
and our state with,
const items = useSelector(state => state);
The useSelector hook accepts a function which gets our Redux state. In this case, since we're only dealing with a single array, we can return the whole state which is our shopping cart.
Now we can import our Action Creators which will dispatch our Action objects.
import { addToCart, clearCart } from "./actionCreators";

// ... const addItem = () => { dispatch(addToCart(text)); }; const clear = () => { dispatch(clearCart()); }; // ...
That's it! We have a simple shopping cart. It may be unpractical, yes, but also highly useful to clear the basic concepts of Redux. Clicking on the buttons in the UI trigger the respective state changes in the store, and the selector returns the state array which we render as a list.
Redux Toolkit (RTK)
As you can see, even for the simplest use-cases we need to write a lot of code when using Redux. We end up creating multiple files for reducers, action creators, middlewares, and so on.
Redux Toolkit aims to simplify our Redux logic, by automatically creating constants and action creators using our reducer definition.
All we have to do is create a 'slice' of the global state, and define our reducer. We can simply de-structure and grab our actions from that slice. Moreover, it comes with redux-thunk as the default middleware. It also uses the immer library to let us modify the state directly. Remember how I said we can't use state.push() because of immutability? Well, with immer we can do exactly that and more.
To read more about Redux Toolkit, check out the documentation.
Redux Alternatives
Although Redux is the leading state management solution, there are still other options we can consider. Let's discuss two of them briefly.
React Context API
The Context API is NOT a state management solution. Rather, it's simply a way to bypass the need for prop-drilling. We have to manually create a store and manage how the state changes with respect to our actions.
In a few lines, this is how Context works:
We can create a Context using the API, which gives us a Provider and a Consumer. At the common parent of our components where the state should be saved, we create a Provider and wrap the children. This allows us to pass a 'value' prop which is our state. This value prop can be accessed anywhere in the children using the Consumer.
❕ Fun Fact: Redux uses the Context API under the hood
One important thing to note is that if we're not using primitive types, our connected components may re-render every time the state changes, even if it's unrelated. To fix this, we can create multiple Providers and Consumers for each separate state, although that can be a bit time-consuming.
MobX
MobX is quite similar to Redux at a quick glance, however, it's different where it counts.
Some key features of MobX include:
Unlike Redux, it can have multiple global stores.
MobX uses observables which make it better to keep track of state changes.
The state is mutable and Reducers are impure.
Both libraries are widely used, however, Redux is much more popular which means it has a bigger developer community and support. As mentioned above, MobX does not use pure reducers, which makes it difficult to test and hard to scale in large environments. This is often the reason developers choose to opt for Redux.
Conclusion
State management is hard. Redux makes it not-so-hard. Once you get over the initial learning curve, you can be confident that using Redux may solve most of your state management problems. Redux also has a wonderful ecosystem with various middleware and tools, such as Redux Toolkit which makes it very easy to get up and going with Redux in a minute.

