ReactDOM.render Explained: React Rendering & Reconciliation
Introduction
The ReactDOM library is not often talked about when working with React, however, It is vital for any React developer to know how ReactDOM.render is used to inject our React code into the DOM. It is also good to get a brief idea of how it works under the hood, so we can write better code to accommodate the architecture.
According to the React docs,
The
react-dompackage provides DOM-specific methods that can be used at the top level of your app and as an escape hatch to get outside of the React model if you need to.
What You Will Learn
By the end of this blog post, you will hopefully know more about:
- How React interacts with the DOM & Virtual DOM
- The Reconciliation Process & React's Fiber Architecture
- Uses of
React.render()& Best Practices - Other ReactDOM methods
Prerequisites - What You Need To Know
This blog post presents an overview of the ReactDOM library. Since it involves some core ReactJS concepts, it is better to be familiar with the library and how it works.
Even if you don't have a deep understanding of React, this blog post can help demystify a lot of concepts related to rendering on the DOM.
Before moving to ReactDOM, let's take a brief look at the Document Object Model.
What is the DOM?
The Document Object Model (DOM) is a code representation of all the webpages that you see on the internet. Every element, such as a button or image that you see on the web-page is a part of a hierarchy of various elements within a tree structure. This means each element (except the root element) is a child of another element. This structure enables you to easily interface your JavaScript code with HTML to create highly powerful and dynamic web applications.
The Virtual DOM
The way that web developers usually work with the DOM to develop interactive websites, is by finding a DOM node and making the required changes to it, such as changing an attribute or adding a child node.
However, for highly dynamic web applications where the DOM needs to be updated frequently, applying these required changes can be a slow process, as the browser ultimately has to update the entire DOM every time. To combat this problem, React works with a Virtual DOM, which is just a representation of the actual DOM that is used behind the scenes to optimize the update process.
When a React element is updated, ReactDOM firstly updates the Virtual DOM. After that, the difference between the actual DOM and the Virtual DOM is calculated, and only the unique part. This means that the whole DOM does not need to be updated every single time.
This process, also known as “reconciliation”, is one of the things that helps us to build blazing fast Single Pages Applications (SPAs) with React.
react-dom
ReactDOM is a package that provides methods that can be used to interact with the DOM, which is needed to insert or update React elements. It provides many helper functions such as:
render()hydrate()unmountComponentAtNode()findDOMNode()createPortal()
And more...
Most of the time when building Single Page Applications (such as with create-react-app), we usually create a single DOM container and call the render method once to initialize our React application. Since this method is always used when working with React, learning about the working of ReactDOM.render can greatly benefit us as React developers.
render()
The render method can be called the primary gateway between React and the DOM.
Let’s say you have defined a React element (<Calculator />), as well as a DOM node to act as a container for that element (div with the ID of “container”). Now, you can use ReactDOM.render to render the element within that container using the syntax given below:
ReactDOM.render(<Calculator />, document.querySelector("#container"))
🔹 Note: If the Calculator component has already been mounted in the div element, calling this again will simply update the DOM based on the difference between the components.
The statement above returns a reference to the component that you have created. If it is a functional component, it returns null.
❕ The return value of render is considered legacy as it may not be useful when future versions of React render components asynchronously.
Parameters:
React element
Selected DOM Node
Callback function (optional)
🔹 Note: ReactDOM.render requires a React element as the first argument. React elements are generated through React.createElement. Therefore, you may use that syntax or simply invoke a JSX interpretation of the component to get the parameters in the correct format for the arguments. Using React.createElement, our code can be modified to look like this:
ReactDOM.render(React.createElement(Calculator), document.querySelector("#container"))
Tree Structure of React Elements
React elements are defined in a tree structure. This means each element is essentially a child of another React element. However, for the root element, we need to create an element (DOM Node) in our HTML code to act as a container for our React element tree, which can be accessed via ReactDOM.render.
For a better understanding, the figure below defines an example React component tree:
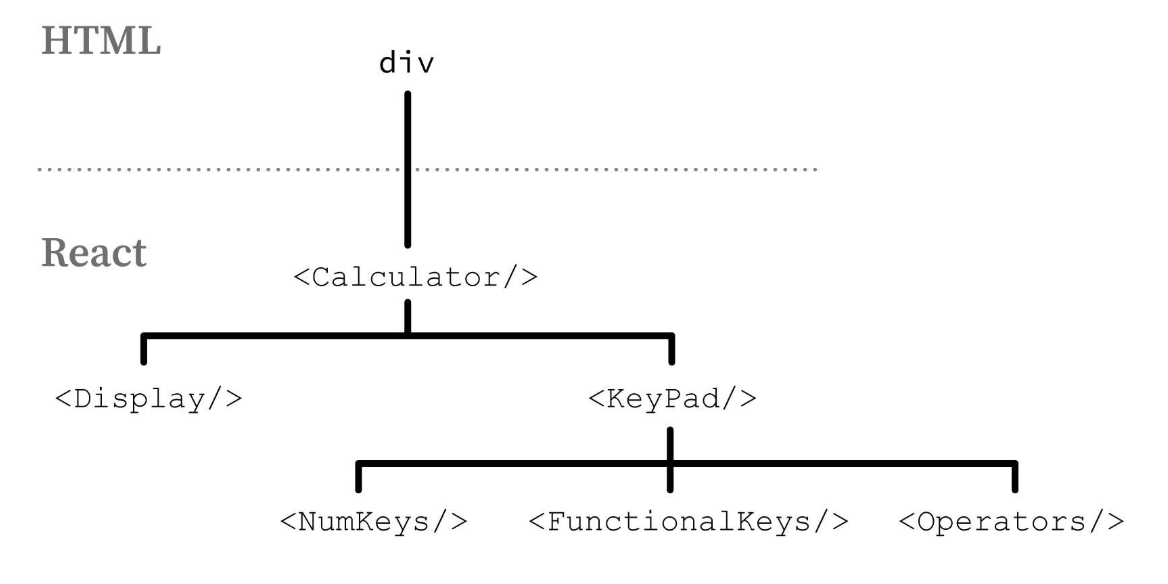
In the above diagram, we can see that <Calculator /> is our root React element, which is rendered into the container div within the HTML code.
Breaking it down further, the <Calculator /> element has two children, <Display /> and <KeyPad />. Similarly, <KeyPad /> is broken down into <NumKeys />, <FunctionalKeys /> and <Operators />.
This is what those components will look like in code:
function Calculator() { return ( <>
function KeyPad() { return ( <>
Reconciliation & The React Fiber Architecture
⬛ The information in this section is not required to know to use React. The learning outcome of this section is to understand briefly the inner workings of React and it’s architecture, and to demystify the black box that is the reconciliation process. It can be beneficial to you if you plan to contribute to the library.
As defined above, the reconciliation process is when the React virtual DOM (AKA the tree of React elements) is checked against the actual DOM, and only the necessary updates are reflected.
In the previous versions of React, a linear synchronous approach was used to update the DOM. It became obvious very quickly that this can greatly slow down our UI updates, negating the whole reason why reconciliation exists in the first place.
In React 16, the team re-wrote major parts of the reconciliation algorithm to make it possible to update the DOM asynchronously. This is possible because of the Fiber architecture which lies at the core of the new implementation.
Fiber works in two phases,
Reconciliation Phase
Commit Phase
Reconciliation (Render) Phase
This phase is triggered when a component is updated through state or props. Therefore, the standard React protocol is followed, where a component is updated and lifecycle hooks are called, after which the DOM nodes that need to be updated are calculated. In Fiber, these activities are termed as “work”.
Before React 16, having multiple work tasks could make our user interface look and feel sluggish because a recursive approach was used with the call stack. The problem with recursion is, that the process only stops when the call stack is empty, which can result in higher time complexity.
As more work is performed, more computational resources are utilized. The updated architecture utilizes the Linked List Data Structure within its algorithm to handle updates. This, used in conjunction with the requestIdleCallback() function provided by newer browsers makes it possible to perform asynchronous tasks (or work) more efficiently.
Each “work” unit is represented by a Fiber Node. The algorithm starts from the top of the Fiber Node Tree and skips nodes until it reaches the one which was updated. Then it performs the required work and moves up the tree until all the required work is performed.
Commit Phase:
During the commit phase, the algorithm first calls the required lifecycle methods before updating or unmounting a component. Then, it performs the actual work, that is, inserting, updating or deleting a node in the DOM. Finally, it calls the post-mutation lifecycle methods componentDidMount and componentDidUpdate.
Along with this, React also activates the Fiber Node Tree that was generated in the previous phase. Doing this ensures synchronization between the tree of React elements and the DOM, as React knows what the current status of the Virtual DOM is.
Whew... however abstract, we now have a faint idea of how the reconciliation process works behind the scenes.
Using ReactDOM.render
Usage in Single Page Applications
Let’s move back to the practical side of things, and discuss how we can use ReactDOM.render in different scenarios.
Assuming we are working with a Single Page Application, we will only need to instantiate the root element (usually App.jsx) at a single location in the DOM. Therefore, oftentimes the lone index.html file is not even touched at all.
All we need to do is create a container, and render our React root element to it, as described above in the Calculator example.
Integrating the React Component tree in any website
We can also use ReactDOM.render to integrate React in a different application. This is why we call React a library, not a framework. You can use it as little as possible or as much as possible, as it completely depends on your use-case.
We can create a wrapper function for our React module. All the required props can be passed to the function, and sent down to the component which is rendered through ReactDOM.render, just like it would be for a single page application.
import ReactDOM from "react-dom"; import React from "react"; const displayCalculator = ({ height, width }, DOMNode) => { ReactDOM.render(
It is important to export the function, as we will need to call it within our JavaScript code.
In the index.html file shown above, we are importing the script that renders our root React component, and then we call the function using plain JavaScript. We can also pass parameters, such as props for our React component, through this function. It is better to initialize React components after the document has loaded.
You can also use ReactDOM.render multiple times throughout the application. This means that if you are creating a new website, or modifying an existing website that does not use React yet, you can use ReactDOM.render to generate some pages using React, while others do not use the library.
Cleaning up React nodes
When you unmount a React component from the DOM, it is important to call unmountComponentAtNode() according to the syntax given below to ensure there are no memory leaks.
ReactDOM.unmountComponentAtNode(DOMContainer)
🔘 It is up to you, the developer, to decide when it is time for clean-up.
This is why the React team suggests using a wrapper for your React root elements. Doing this ensures that you can mount and unmount React nodes according to the design of your website. For example, moving from one React page to another that uses separate React root elements, it is possible to integrate the wrapper API with the page transition, which can automatically unmount the component for you.
Similarly, you can also write the logic in your wrapper to unmount a React root component within the same page, as soon as its work is done.
Updating a Component with ReactDOM.render()
To update a component, you may call ReactDOM.render again for the same React element and DOM node. However, one thing that is important to note is that ReactDOM.render completely replaces all of your props each time this function is called.
This means, you must also pass all of the other required props to the element that you are rendering, which can be an issue. The reason for the props being replaced is because React elements are immutable. The React team explains how you can create a wrapper to set the previous props again.
More ReactDOM methods
Although render() is the most commonly used ReactDOM method, there are a few more available at your disposal. Let’s take a look at two of those.
hydrate()
It is similar to render(), however, it is used when rendering pages through Server Side Rendering (SSR). It integrates the necessary event handlers and functions to the markup that has been generated.
createPortal()
Portals can be created to render a component outside of the React component tree of that specific component. This can be highly useful to generate elements somewhere unrelated on the page.
Conclusion
To sum it up, ReactDOM acts as a powerful interface between our React component tree and the DOM. The most commonly used method from ReactDOM is render(), which can be used to connect entire React applications to the DOM.
Once the React element and it’s child tree have been inserted into the DOM, the reconciliation process handles everything related to updates. Due to this process, whenever we update a part of our component tree, only the changes in that part are reflected in the actual DOM, thereby saving us a lot of extra computation.
React and ReactDOM provides powerful functions such as render() that make it easy to create fast and snappy Single Page Applications through React, which makes React such a popular front-end development library.

